- Example of Java Swing Application with Oracle Database – 1
- Example of Java Swing Application with Oracle Database – 2
- Example of Java Swing Application with Oracle Database – 3
- Example of Java Swing desktop application without the JSR - 1
In NetBeans 7.1, we need to create a Java Application Project:


We really don't need that class, because we are going to create a JFrame, which automatically creates a main() method that launches it and makes the frame visible.
Anyway, and before creating the JFrame, let's add the needed references to our new project. We need to add, in the project libraries, references to projects HelperDB and librarySystemBLL. References to "ojdbc" jars that come with Oracle XE also need to be added, just like we did before in the other two projects.

Now, let's create the JFrame, that will be the application's main window:
- with the mouse cursor over the package name (librarysystemgui), right click and select New --> JFrame Form...

- Give it a name (librarySystem):

And it is created:

A JFrame, just like a JDialog and a JPanel, is a Swing class, and NetBeans allows to grafically compose Swing elements on it, by dragging them from the pallete and droping them on where we want them to be:

Drag a menu bar from the pallete, onto the JFrame, then two menus (Book and Loans).
And, drag a menuItem into menu Books, and change its text to List Books:

Then, you may delete the initial class with the main method that we don't need.
Now, we want to have several panels laid out on the main frame central area. For that, we drag a panel to the JFrame's central area and name it mainPanel:

Now, we let the main panel empty, and create a new JPanel Form (listBooksJPanel.java).

Drag a JTable onto the new JPanel, and size it to occupy all available space.
Then, we need to configure the JTable, so that its columns have the name we want them to have. So right click on the JTable object and select Costumize Code.
On the Code customizer window, change the "default code" to "custom property", as in the figure below, and make the illustrated changes:

Now the columns are named Title, Author, Editor, Edition and Isbn.
Now, click the Source button (near the Design button), on NetBeans, when editing the ListBooksJPanel.java, so that you can see the code that has been generated.
We need to populate the JTable, when the ListBooksJPanel is created in execution time.
For that, we are going to add some code in the generated class creator method, after the call to InitComponents().

Add the following code:
try {
List<Book> lsBooks = Book.retrieveAllBooks(new DBAccessObj());
limparJTableBooks();
if(!lsBooks.isEmpty()){
javax.swing.table.DefaultTableModel model1 = (javax.swing.table.DefaultTableModel)jTable1.getModel();
Iterator<Book> iterBooks = lsBooks.iterator();
while(iterBooks.hasNext()){
Book book = iterBooks.next();
//
int id = book.getID();
String title = book.getTitle();
//
String authors = "";
//
Iterator<Author> bookAuthors = book.getAuthors().iterator();
while(bookAuthors.hasNext()){
Author au = bookAuthors.next();
authors += au.getSurname() + ", " + au.getName() + "; ";
}
//
String editor = book.getEditor();
String edition = "";
edition = book.getEdition();
//
String isbn = book.getISBN();
//
model1.addRow(new Object[]{title, authors, editor, edition, isbn});
}
}
} catch (SQLException ex) {
System.out.println(ex);
}
Remember that you need to reference the previously developed projects in this project's libraries.
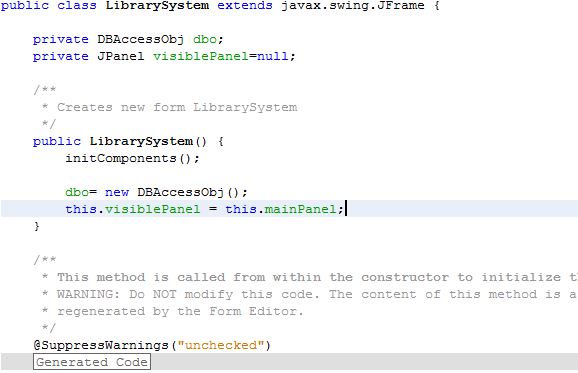
Now, getting back to the JFrame, we want to make the listBooksJPanel visible, when the user chooses the ListBooks menu item.

Now let's run the example... (of course you need to add data in the database).

As usual, you may add comments to this article with questions about unclear issues...
Hey just now i came to know that net bean does not support desktop app projects from v7.0. The article is very much useful for me. But i need the source to work on it. Kindly mail me the source code [mail@:sathya.wish@gmail.com]
ReplyDeleteHow to download code?
ReplyDeleteHow to download code?
ReplyDeleteLearn how to structure and organize data efficiently using models that support accurate analysis and decision-making.data modeling training courses
ReplyDeleteThis comment has been removed by the author.
ReplyDeleteLearn core Java programming concepts to build secure, scalable, and high-performance applications.java training online
ReplyDeleteLearn to design user-friendly and visually appealing digital products by focusing on user experience and interface design. ui courses online
ReplyDeleteLearn to access, verify, dell boomi online training
ReplyDeleteand manage digital land records using the Bhoomi land information system.
"Enhance your data analysis skills with our comprehensive power bi online training
ReplyDeleteLearn to create interactive dashboards, visualize data effectively, and make informed business decisions from anywhere. Our expert-led courses provide hands-on experience, real-world projects, and flexible learning schedules tailored for beginners and professionals alike."
Boost your career with our tableau developer training
ReplyDeletemastering data visualization, dashboards, and analytics for real-world business insights. Learn hands-on techniques to transform raw data into actionable intelligence efficiently.
Boost your career with our salesforce admin course
ReplyDeletedesigned for beginners and professionals to master Salesforce platform administration. Learn to manage users, customize dashboards, and automate business processes efficiently.